本篇就不废话啦,接着上篇记录我见过或者使用过的与GCD相关的API。由于一些API使用的非常少,用过之后难免会忘记,还是记录一下比较好。
6.dispatch_group_wait
该API依然是与dispatch_group配合使用。它会阻塞当前所在的线程,直到前面的blocks 执行完成,或者超时的时候返回。

大致意思是:该方法会同步的等待之前提交的block 对象们完成,如果在给定的时间内没有完成,该方法就会返回。如果在给定的时间超时前完成,则返回0,否则就返回一个非零的值。
示例代码:
    dispatch_group_t group = dispatch_group_create();
    dispatch_queue_t queue = dispatch_get_global_queue(0, 0);
    for (int i = 0; i < 5; i++) {
        dispatch_group_async(group, queue, ^{
            [NSThread sleepForTimeInterval:i];
            NSLog(@"并发%d结束----线程:%@", i,[NSThread currentThread]);
        });
    }

    dispatch_time_t time = dispatch_time(DISPATCH_TIME_NOW, (int64_t)(2 * NSEC_PER_SEC));
    long result = dispatch_group_wait(group, time);
    if (result) {
        NSLog(@"超时了");
    } else {
        NSLog(@"执行完毕");
    }
// 打印结果是:
2016-07-12 14:04:17.980 PractiseProject[4537:155453] 并发0结束----线程:<NSThread: 0x7fbbe8e115e0>{number = 3, name = (null)}
2016-07-12 14:04:18.981 PractiseProject[4537:155441] 并发1结束----线程:<NSThread: 0x7fbbe8f5ee60>{number = 4, name = (null)}
2016-07-12 14:04:19.980 PractiseProject[4537:155338] 超时了
2016-07-12 14:04:19.981 PractiseProject[4537:155456] 并发2结束----线程:<NSThread: 0x7fbbe8f5d260>{number = 5, name = (null)}
2016-07-12 14:04:20.985 PractiseProject[4537:155464] 并发3结束----线程:<NSThread: 0x7fbbe8f60e90>{number = 6, name = (null)}
2016-07-12 14:04:21.984 PractiseProject[4537:155453] 并发4结束----线程:<NSThread: 0x7fbbe8e115e0>{number = 3, name = (null)}
由于
dispatch_group_wait会阻塞线程,在dispatch_group_wait后面的代码并不会执行,如果我们在主线程中执行上面的代码段,则会阻塞UI界面。所以我们应该在子线程中执行上面的代码片段(用一个dispatch_async包起来)。
如果我们设置wait的时间为永远的话,由于在子线程中执行的任务总有结束的时候,那么dispatch_group_wait之后执行的代码就效果就与上一篇中的dispatch_group_notify 的功能类似啦。
完整的示例代码:
    dispatch_queue_t queue = dispatch_get_global_queue(0, 0);
    dispatch_async(queue, ^{
        dispatch_group_t group = dispatch_group_create();
        for (int i = 0; i < 5; i++) {
            dispatch_group_async(group, queue, ^{
                [NSThread sleepForTimeInterval:i];
                NSLog(@"并发%d结束----线程:%@", i,[NSThread currentThread]);
            });
        }

        long result = dispatch_group_wait(group, DISPATCH_TIME_FOREVER);
        if (result) {
            NSLog(@"超时了");
        } else {
            dispatch_async(dispatch_get_main_queue(), ^{
                NSLog(@"执行完毕,回主线程更新UI");
            });
        }
    });
7.dispatch_apply
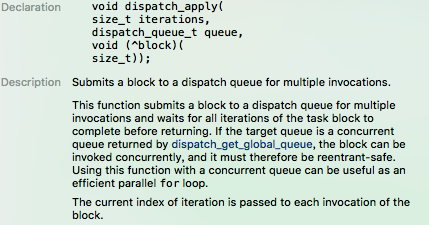
在上面的代码中,我们使用for循环来创建5个并发执行的任务。但是for循环调度还是会有那么一点点的性能开销,而使用dispatch_apply可以避免这一点性能开销(我们都知道迭代器比使用for循环效率要高一点)。

大致意思是:该方法会等apply 中多次迭代调用的block全都执行完成后,才会返回,所以dispatch_apply会阻塞当前线程,我们得避免在主线程中使用dispatch_apply。另外,说明中已经说的很清楚了,如果我们使用dispatch_get_global_queue创建的并发队列,那么传入的block任务是并发执行的。
如果我们在串行队列中执行该方法,会发生死锁,所以第二个参数,千万不要传串行队列。如果我们使用dispatch_queue_create创建的并发队列,block任务依然是顺序执行的。
下面看一下示例代码以及运行结果: dispatch_apply / dispatch_queue_create /并发队列:
    dispatch_queue_t queue = dispatch_queue_create("com.haley.cn", DISPATCH_QUEUE_CONCURRENT);
    dispatch_async(queue, ^{
        dispatch_apply(5, queue, ^(size_t index) {
            [NSThread sleepForTimeInterval:index];
            NSLog(@"并发%zu---%@",index,[NSThread currentThread]);
        });
        NSLog(@"done - %@",[NSThread currentThread]);
    });
    NSLog(@"主线程");
// 输出结果:
2016-07-12 16:09:33.856 PractiseProject[5496:207665] 主线程
2016-07-12 16:09:33.857 PractiseProject[5496:207710] 并发0---<NSThread: 0x7f950053a920>{number = 3, name = (null)}
2016-07-12 16:09:34.860 PractiseProject[5496:207710] 并发1---<NSThread: 0x7f950053a920>{number = 3, name = (null)}
2016-07-12 16:09:36.864 PractiseProject[5496:207710] 并发2---<NSThread: 0x7f950053a920>{number = 3, name = (null)}
2016-07-12 16:09:39.867 PractiseProject[5496:207710] 并发3---<NSThread: 0x7f950053a920>{number = 3, name = (null)}
2016-07-12 16:09:43.872 PractiseProject[5496:207710] 并发4---<NSThread: 0x7f950053a920>{number = 3, name = (null)}
2016-07-12 16:09:43.873 PractiseProject[5496:207710] done - <NSThread: 0x7f950053a920>{number = 3, name = (null)}
dispatch_apply / dispatch_get_global_queue:
    dispatch_queue_t queue = dispatch_get_global_queue(0, 0);
    dispatch_async(queue, ^{
        dispatch_apply(5, queue, ^(size_t index) {
            [NSThread sleepForTimeInterval:index];
            NSLog(@"并发%zu---%@",index,[NSThread currentThread]);
        });
        NSLog(@"done - %@",[NSThread currentThread]);
    });

    NSLog(@"主线程");
// 输出结果:
2016-07-12 16:15:26.634 PractiseProject[5544:210845] 主线程
2016-07-12 16:15:26.634 PractiseProject[5544:210882] 并发0---<NSThread: 0x7f8733816bc0>{number = 3, name = (null)}
2016-07-12 16:15:27.637 PractiseProject[5544:210887] 并发1---<NSThread: 0x7f8731517e10>{number = 2, name = (null)}
2016-07-12 16:15:28.637 PractiseProject[5544:210893] 并发2---<NSThread: 0x7f8731412d50>{number = 4, name = (null)}
2016-07-12 16:15:29.636 PractiseProject[5544:210899] 并发3---<NSThread: 0x7f8731448cc0>{number = 5, name = (null)}
2016-07-12 16:15:30.635 PractiseProject[5544:210882] 并发4---<NSThread: 0x7f8733816bc0>{number = 3, name = (null)}
2016-07-12 16:15:30.635 PractiseProject[5544:210893] done - <NSThread: 0x7f8731412d50>{number = 4, name = (null)}
8.dispatch_semaphore
在我们使用多线程处理多个并发任务,而这多个并发任务有资源竞争的时候,就需要一种机制,在资源不够用时,让新的任务处于等待状态,当有可用资源时,等待的任务在按序依次执行。
像这一类问题除了可以用NSOperation,设置最大并发数外,还可以使用信号量。
这里涉及到的API有如下几个:
dispatch_semaphore_t dispatch_semaphore_create(long value);
创建信号量的方法,如果初始值小于0,则会返回NULL,即信号量创建失败。 参数:value 表示初始的信号量个数,可以理解为资源个数,或者最大并发个数。
long dispatch_semaphore_wait(dispatch_semaphore_t dsema, dispatch_time_t timeout);
参数:第一个参数为信号量对象,第二个参数是等待超时的时间。
讲解:该方法相当于任务开始前的检查,需要注意的是该方法会阻塞当前线程。如果此时信号量的值大于0,会返回0,并且代码会继续往下执行;如果此时信号量的值等于0,那么此时该方法会阻塞当前线程,等待timeout 的时间。如果在超时的时间内,依然没有可用的资源,那么该方法会返回一个非0的值。 该方法执行时,会使信号量的值减1。
long dispatch_semaphore_signal(dispatch_semaphore_t dsema);
该方法应该在任务执行完毕时调用,它会使信号量的值加1。
下面用一段实际代码演示GCD信号量的使用:
    dispatch_queue_t queue = dispatch_get_global_queue(0, 0);
    // 在子线程中执行,防止阻塞主线程
    dispatch_async(queue, ^{
        // 创建一个有3个资源的信号量
        dispatch_semaphore_t semaphore = dispatch_semaphore_create(3);
        for (int i = 0; i < 6; i++) {
            // 检测还有多少个资源,执行后会使资源数减少1
            dispatch_semaphore_wait(semaphore, DISPATCH_TIME_FOREVER);
            dispatch_async(queue, ^{
                NSLog(@"开始执行任务%d---%@",i,[NSThread currentThread]);
                [NSThread sleepForTimeInterval:6 - i];
                NSLog(@"完成任务%d---%@",i,[NSThread currentThread]);
                // 表示资源使用完毕,会使资源数加1
                dispatch_semaphore_signal(semaphore);
            });
        }
    });
// 输出结果:
2016-07-13 17:23:53.178 PractiseProject[4973:196435] 开始执行任务1---<NSThread: 0x7fc07060a090>{number = 4, name = (null)}
2016-07-13 17:23:53.178 PractiseProject[4973:196436] 开始执行任务0---<NSThread: 0x7fc070722030>{number = 3, name = (null)}
2016-07-13 17:23:53.178 PractiseProject[4973:196437] 开始执行任务2---<NSThread: 0x7fc070455f10>{number = 5, name = (null)}
2016-07-13 17:23:57.179 PractiseProject[4973:196437] 完成任务2---<NSThread: 0x7fc070455f10>{number = 5, name = (null)}
2016-07-13 17:23:57.179 PractiseProject[4973:196437] 开始执行任务3---<NSThread: 0x7fc070455f10>{number = 5, name = (null)}
2016-07-13 17:23:58.182 PractiseProject[4973:196435] 完成任务1---<NSThread: 0x7fc07060a090>{number = 4, name = (null)}
2016-07-13 17:23:58.182 PractiseProject[4973:196435] 开始执行任务4---<NSThread: 0x7fc07060a090>{number = 4, name = (null)}
2016-07-13 17:23:59.179 PractiseProject[4973:196436] 完成任务0---<NSThread: 0x7fc070722030>{number = 3, name = (null)}
2016-07-13 17:23:59.179 PractiseProject[4973:196436] 开始执行任务5---<NSThread: 0x7fc070722030>{number = 3, name = (null)}
2016-07-13 17:24:00.184 PractiseProject[4973:196435] 完成任务4---<NSThread: 0x7fc07060a090>{number = 4, name = (null)}
2016-07-13 17:24:00.184 PractiseProject[4973:196437] 完成任务3---<NSThread: 0x7fc070455f10>{number = 5, name = (null)}
2016-07-13 17:24:00.184 PractiseProject[4973:196436] 完成任务5---<NSThread: 0x7fc070722030>{number = 3, name = (null)}
9.dispatch_source中的timer
dispatch_source_t 的类型有很多种:
#define DISPATCH_SOURCE_TYPE_DATA_ADD
#define DISPATCH_SOURCE_TYPE_DATA_OR
#define DISPATCH_SOURCE_TYPE_MACH_RECV
#define DISPATCH_SOURCE_TYPE_MACH_SEND
#define DISPATCH_SOURCE_TYPE_PROC
#define DISPATCH_SOURCE_TYPE_READ
#define DISPATCH_SOURCE_TYPE_SIGNAL
#define DISPATCH_SOURCE_TYPE_TIMER
#define DISPATCH_SOURCE_TYPE_VNODE
#define DISPATCH_SOURCE_TYPE_WRITE
#define DISPATCH_SOURCE_TYPE_MEMORYPRESSURE
这里记录的是dispatch_source 中定时器timer的用法。
这里我就用dispatch_source 封装一个timer 的方法,可以在传入两个block,分别在循环执行,结束时执行。当然咯,下面这个方法还可以再加一个间隔时间参数。
- (void)startTimerWithTimeout:(NSTimeInterval)timeout eventBlock:(void (^)())eventBlock endBlock:(void (^)())endBlock
{
    __block NSTimeInterval tempTimeout = timeout;
    // 创建一个队列,不管你创建什么类型的队列,最终event_handler 都是在子线程中执行的
    dispatch_queue_t queue = dispatch_get_global_queue(0, 0);
    // 创建一个计时器类型的源
    dispatch_source_t timer = dispatch_source_create(DISPATCH_SOURCE_TYPE_TIMER, 0, 0, queue);
    // 设置定时器参数,定时器开始的时间、每隔多久执行一次、精度(可以延迟的纳秒数,最高精度是0,实际还是会有偏差,感觉没什么卵用)
    dispatch_source_set_timer(timer, DISPATCH_TIME_NOW, 1.0 * NSEC_PER_SEC, 0);
    dispatch_source_set_event_handler(timer, ^{
        NSLog(@"EVET ---- %@",[NSThread currentThread]);
        if (tempTimeout <= 0) {
            // 倒计时结束,取消源
            dispatch_source_cancel(timer);
            // 回到主线程更新UI
            dispatch_async(dispatch_get_main_queue(), ^{
                // 倒计时结束时界面的UI的更新
                if (endBlock) {
                    endBlock();
                }
            });
        } else {
            // 回到主线程更新UI
            dispatch_async(dispatch_get_main_queue(), ^{
                // 做界面的UI的更新
                if (eventBlock) {
                    eventBlock();
                }
            });

            tempTimeout--;
        }
    });
    dispatch_resume(timer);
}
封装好之后,调用起来就非常的Easy啦,并且看起来也挺舒服的。其实你可以把上面的方法封装成一个工具类方法。
    [self startTimerWithTimeout:30 eventBlock:^{
        NSLog(@"定时执行---%@",[NSThread currentThread]);
    } endBlock:^{
        NSLog(@"结束执行---%@",[NSThread currentThread]);
    }];
10.dispatch_source 中神奇的数据合并
上面介绍了dispatch_source 有多种类型,发现一种神奇的类型DISPATCH_SOURCE_TYPE_DATA_ADD,这种类型的source 有什么特别之处呢?
假如我们并发执行多个任务,这种类型的source 会在任务完成时,将data 加1,然后如果主线程比较空闲,那么event_handler就会多次调用,而如果主线程恰好比较忙碌,那么就会将任务合并,event_handler调用次数就会比较少。
还是先上一个代码范例:
    dispatch_queue_t queue = dispatch_get_global_queue(0, 0);
    dispatch_source_t source = dispatch_source_create(DISPATCH_SOURCE_TYPE_DATA_ADD, 0, 0, queue);
    dispatch_source_set_event_handler(source, ^{
        unsigned long completion = dispatch_source_get_data(source);
        NSLog(@"完成的任务个数:%lu----%@",completion,[NSThread currentThread]);
        dispatch_sync(dispatch_get_main_queue(), ^{
            NSLog(@"更新UI");
        });
    });

    dispatch_resume(source);
    dispatch_async(queue, ^{
        NSLog(@"网络线程---%@",[NSThread currentThread]);
        [NSThread sleepForTimeInterval:2.0];
        dispatch_source_merge_data(source, 1);
    });

    dispatch_async(queue, ^{
        NSLog(@"网络线程---%@",[NSThread currentThread]);
        [NSThread sleepForTimeInterval:2.0];
        dispatch_source_merge_data(source, 1);
    });
//打印结果:
2016-07-13 15:38:45.911 PractiseProject[4130:150701] 网络线程---<NSThread: 0x7f9e12c10c90>{number = 2, name = (null)}
2016-07-13 15:38:45.911 PractiseProject[4130:150694] 网络线程---<NSThread: 0x7f9e12da6cb0>{number = 3, name = (null)}
2016-07-13 15:38:47.915 PractiseProject[4130:150701] 完成的任务个数:2----<NSThread: 0x7f9e12c10c90>{number = 2, name = (null)}
2016-07-13 15:38:47.915 PractiseProject[4130:150659] 更新UI
// 这也是打印结果:
2016-07-13 15:48:56.601 PractiseProject[4212:155405] 网络线程---<NSThread: 0x7fe390e09270>{number = 2, name = (null)}
2016-07-13 15:48:56.601 PractiseProject[4212:155411] 网络线程---<NSThread: 0x7fe390e0f800>{number = 3, name = (null)}
2016-07-13 15:48:59.304 PractiseProject[4212:155405] 完成的任务个数:1----<NSThread: 0x7fe390e09270>{number = 2, name = (null)}
2016-07-13 15:48:59.330 PractiseProject[4212:155377] 更新UI
2016-07-13 15:49:01.309 PractiseProject[4212:155415] 完成的任务个数:1----<NSThread: 0x7fe390e1d630>{number = 4, name = (null)}
2016-07-13 15:49:01.309 PractiseProject[4212:155377] 更新UI
它会根据主线程的繁忙与空闲,以及每个任务完成时的时间,减少返回次数或者每次返回。使用场景主要可以用在同时执行多个任务,任务的完成个数这种情况。
Have Fun!